All Microsoft Purview Information Protection solutions build on Sensitivity Labels as a foundational component. Sensitivity labels let you classify and protect your organization’s data, while ensuring user productivity and their ability to collaborate isn’t hindered. I like to think of Sensitivity labels as the ‘gateway drug’ and bedrock of a well-designed Data Security Program at your enterprise organization. At a program level, sensitivity labels connect classification taxonomy to Purview administration, Microsoft 365 workloads, and downstream controls such as DLP, IRM, eDiscovery, activity monitoring, and Copilot protections. There are a couple of ways to configure and deploy them, but the focus of this blog post is to show you how to configure Sensitivity labels the easy way.
This post is part of a series on Microsoft Purview Sensitivity Labels. This is blog post 2, that will focus on how to configure Sensitivity labels in a way that’s easy and manageable for enterprise organizations. If you want a primer on what Microsoft Purview Sensitivity labels are, please refer to blog post 1 in this series.
First… Is There More Than One Way?
Yes, there are two ways your admins can go about configuring and deploying Microsoft Purview Sensitivity labels:
- Via the User Interface in the Microsoft Purview portal.
- Via PowerShell (specifically the Security & Compliance PowerShell module that is a part of the Exchange Online Management module).
Ok… So What’s the Easy Way?
The easy way is via the User Interface in the Microsoft Purview portal. I realize for hardcore fans of PowerShell, this could sound like I’ve chosen violence today. On the contrary, I believe most of the case that’s been made for why the PowerShell approach is the preferred way to configure and deploy Sensitivity labels boils down to technical preference of those who have years and years of experience in PowerShell for all kinds of things. Alternatively, their role involves serving as a remote administrator for several organizations and they have a system in place they find is scalable for them. PowerShell does create advantages from a reporting standpoint or to verify current state if several Sensitivity labels are already deployed at your organization. And yes, it is true that an important prerequisite step your admins need to perform requires PowerShell. In my opinion that’s where the advantages of this approach end. Right within the Microsoft Purview portal is the easy way to configure and deploy Sensitivity labels at your enterprise organization..
Before You Begin.
The step-by-step approach I’m showing in this blog post demonstrates the configuration experience in Microsoft Purview for organizations that are on Microsoft 365 E5 or E7 licenses. There are notable differences between this experience and what admins on E3 licenses will see. It is also important to note that the correct permissions to create and manage sensitivity labels are required.
When you have logged in with an admin account that has the required permissions, follow these steps:
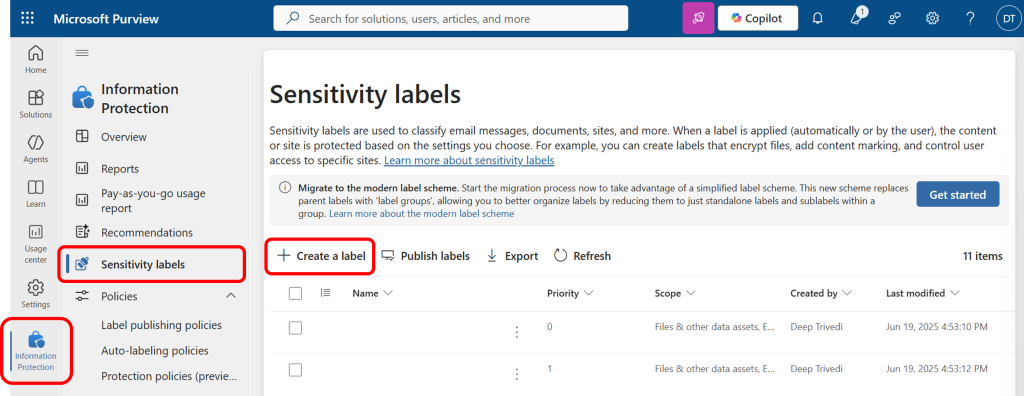
Step 1: Navigate to the Microsoft Purview Portal > Information Protection > Sensitivity labels. Select Create a label.
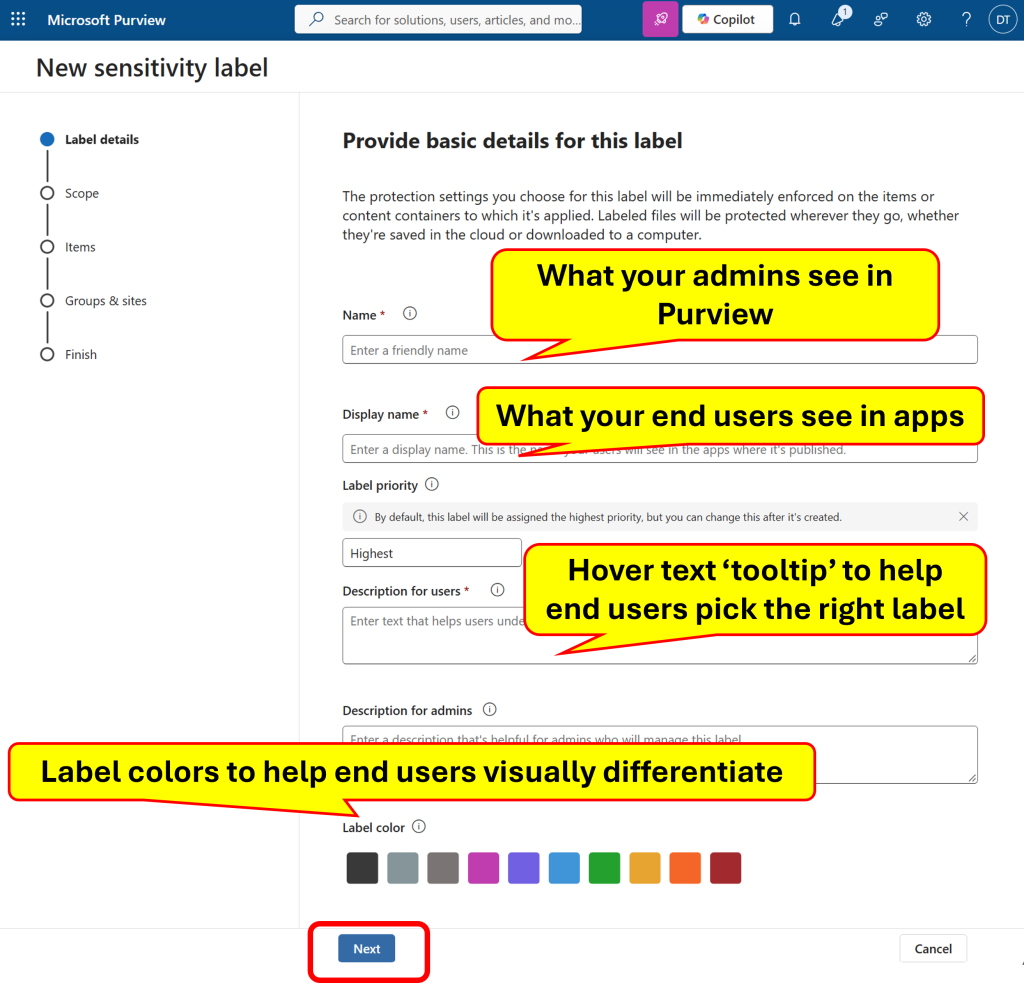
Step 2: Provide basic details for the Sensitivity label you want to create.
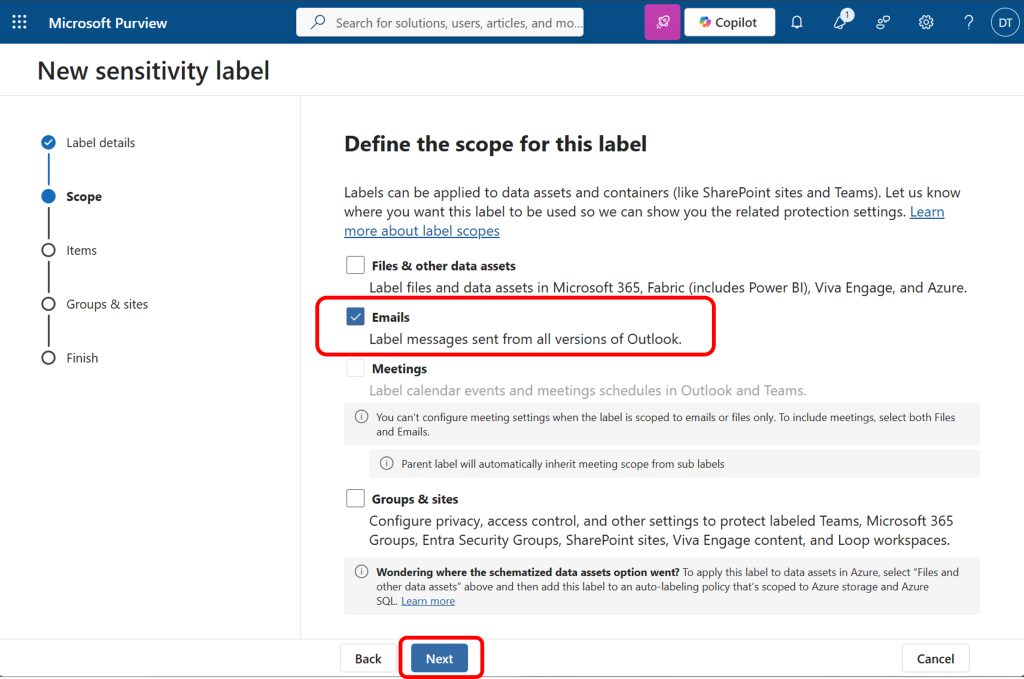
Step 3: Define the scope for the Sensitivity label you are creating. In this example we are scoping to just emails.
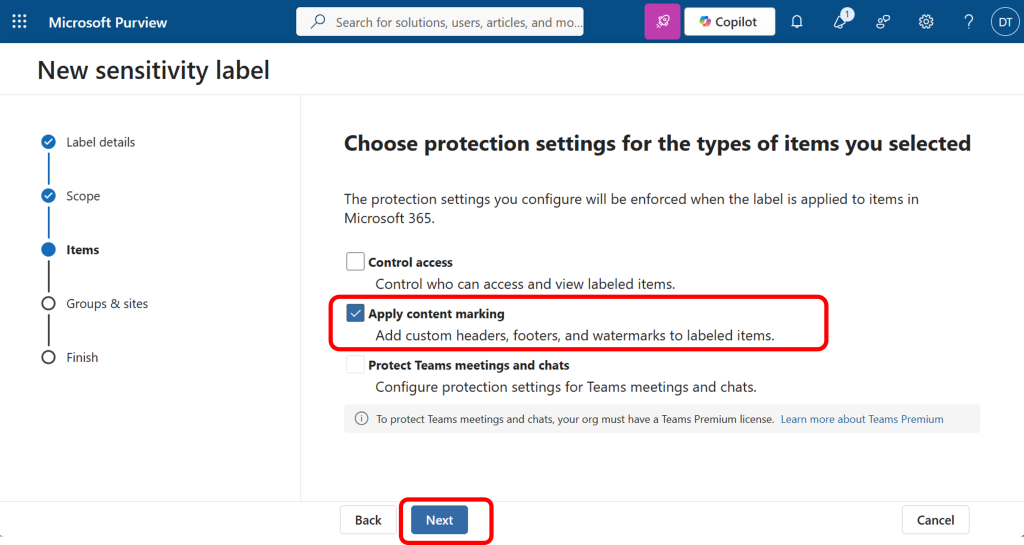
Step 4: Choose the protection settings for the item/scope selected. In this example let’s configure content markings (in the next screen).
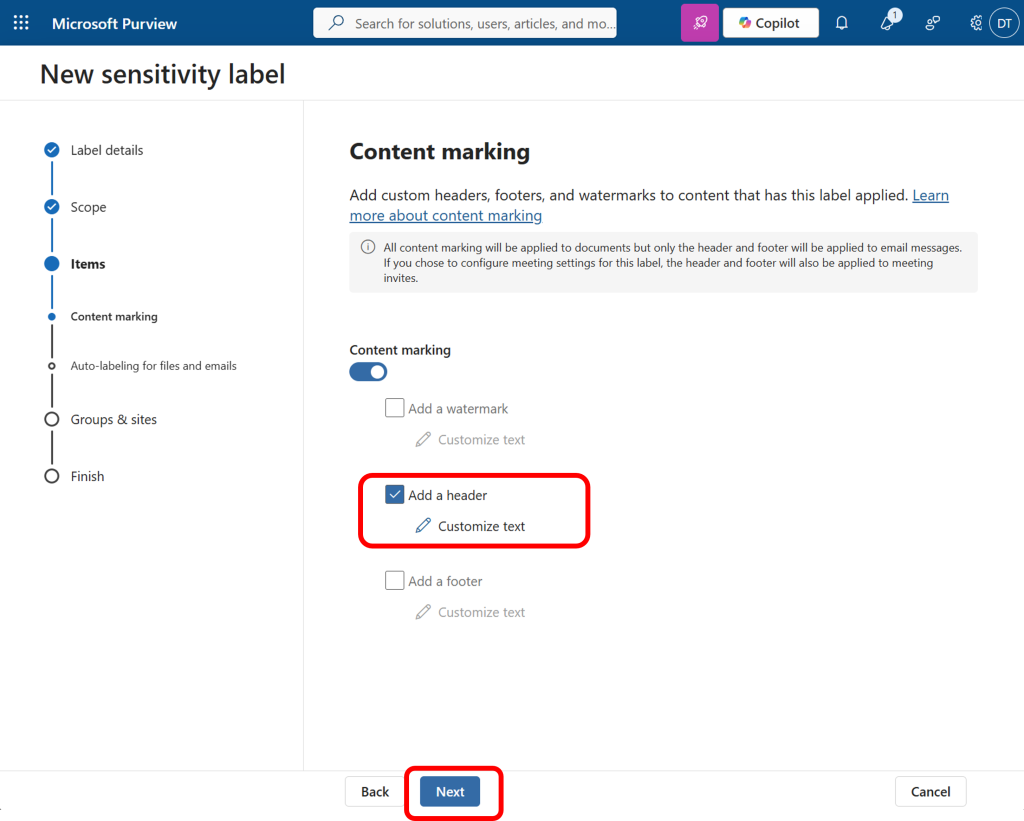
Step 5a: Specify the type of content marking. In this example let’s configure a header. Selecting ‘customize text’ will reveal the flyout where you can make those changes.
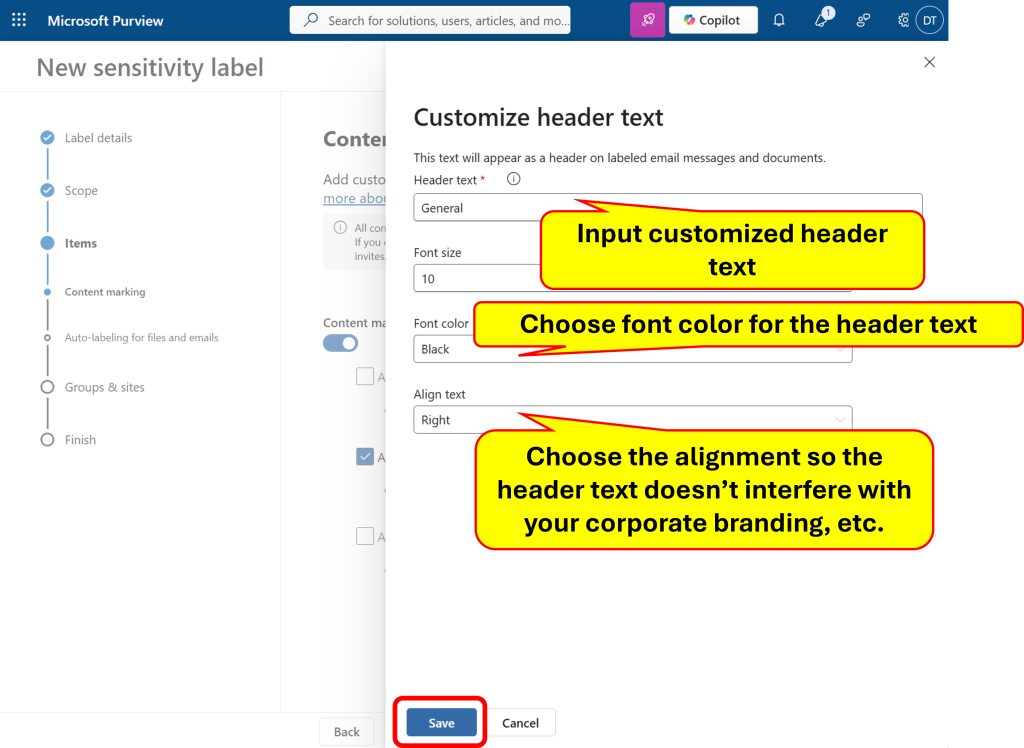
Step 5b: In the flyout, specify the type of content marking. In this example let’s configure a header, and customize the header text.
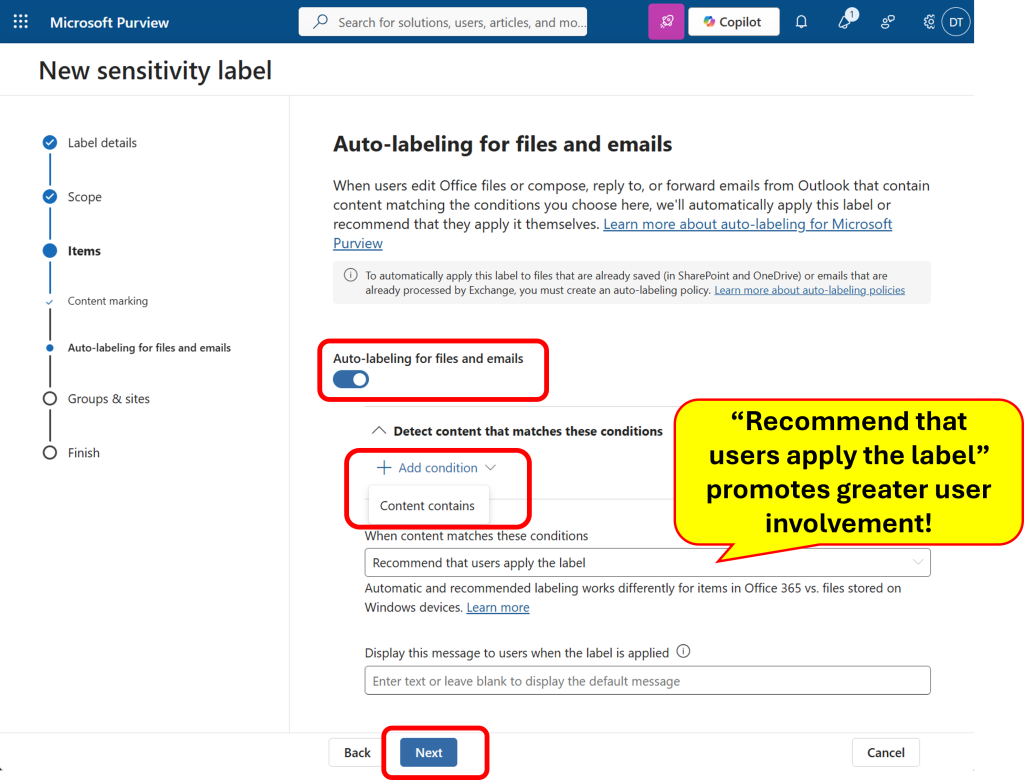
Step 6: Auto-labelling is a best practice, as it reduces the friction for label adoption at scale.
Note: What this configuration step achieves is that when the system detects specific content, it will “recommend that users apply the label”. This promotes greater end-user involvement and allows users to decline the recommendation in false-positive scenarios. This helps ensure content has the most appropriate label applied to it and that your end-users (who have the more trained eye to spot discrepancies) are actively involved in verifying that the content they are working with is appropriately labeled. This drives greater leadership confidence in your Data Security program as it continues to be built out over time. Recall that at the top of this blog post I mentioned how All Microsoft Purview Information Protection solutions build on Sensitivity Labels as a foundational component.
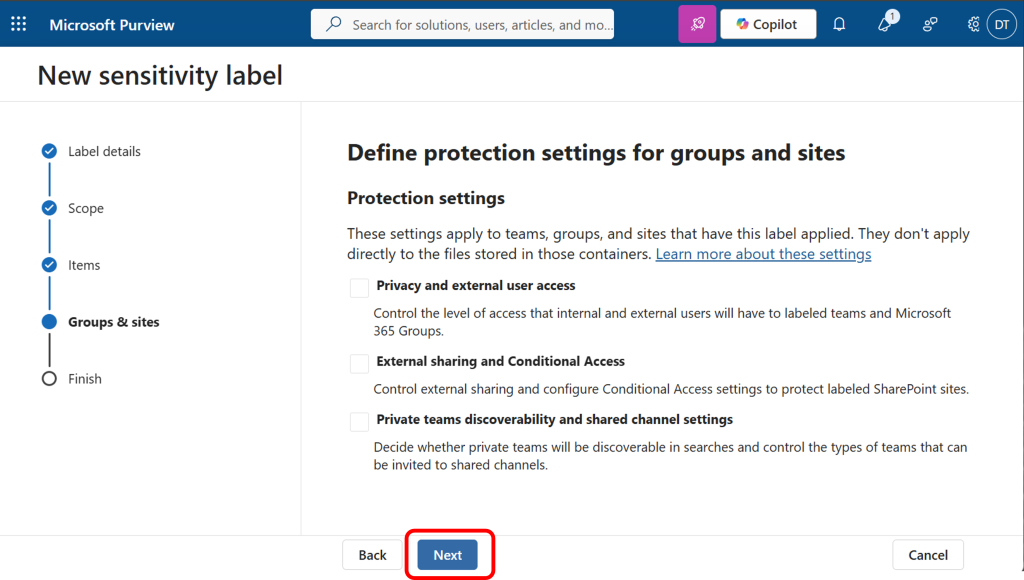
Step 7: Define protection settings for groups and sites, if applicable. This screen shows the protection settings that can be applied to the ‘container’ (Teams, groups, sites). Bear in mind that this will not automatically apply to the files that are stored within those containers. In this example, let’s leave these protection settings de-selected.
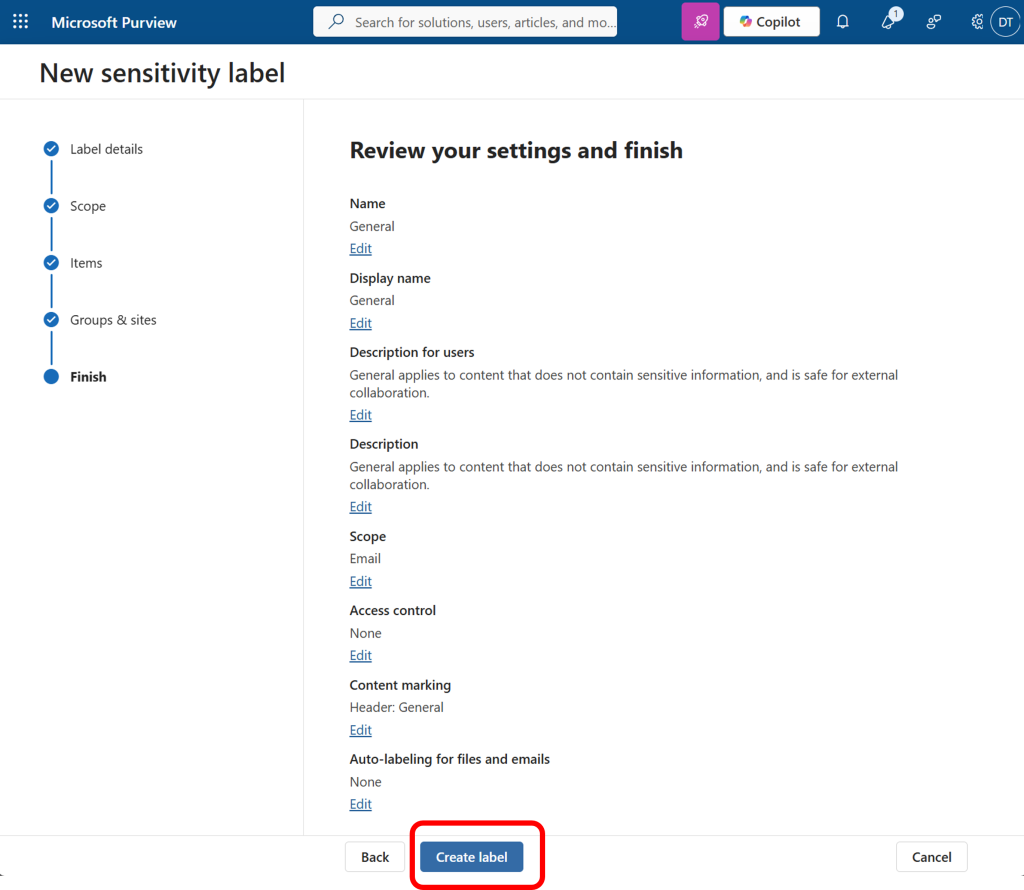
Step 8: Review your configuration, and if anything needs to be modified, edit as needed. If everything looks like it should, select “Create label”.
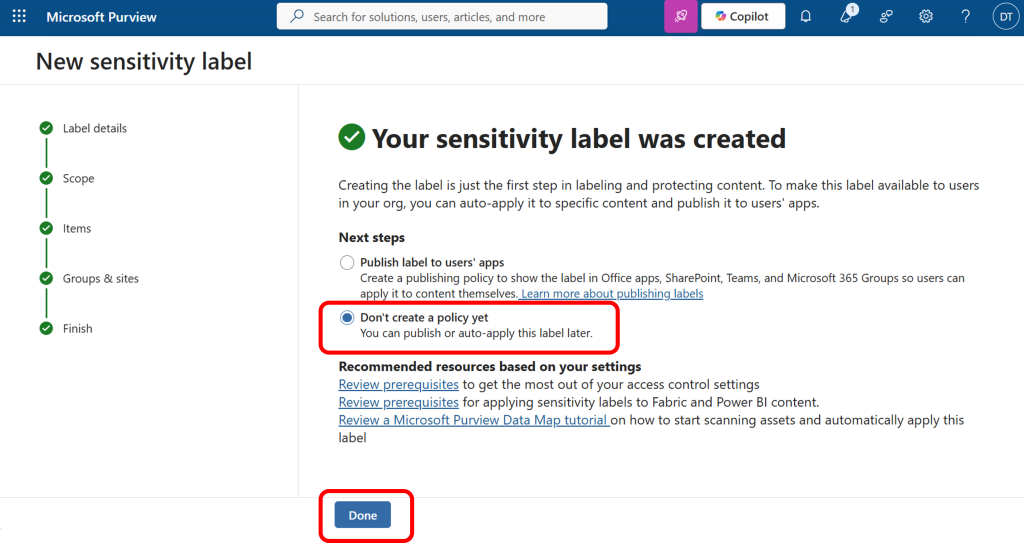
Step 9: Hooray, your label is now created! As a part of your next steps, this screen does give you the option to “publish” label to users’ apps (i.e.: it appears for users within the “sensitivity” button or within the MPIP Client). However, here’s where I recommend that you select “Don’t create a policy yet”. This gives you a chance to think through some additional aspects which I always recommend you take a moment’s pause before rushing to publish.
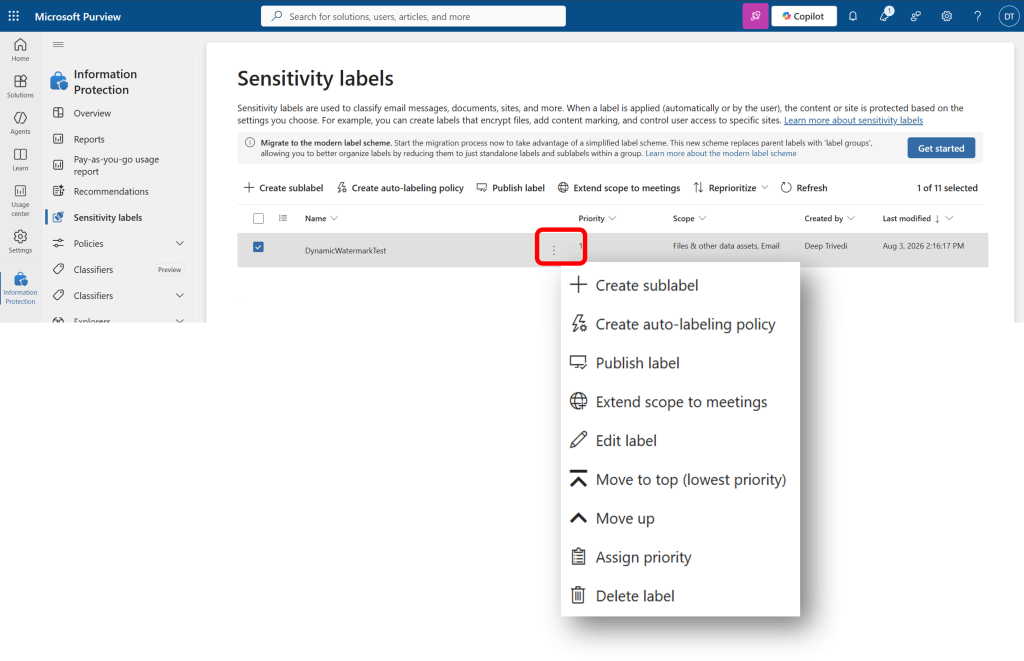
Step 10: Return to the Sensitivity labels screen where additional options are available to you for the label you just created (e.g.: create a sublabel, extend its scope to meetings, edit the label or reprioritize, etc.). Here’s an example of a label that I created previously, to show you the options available at the time of this writing:
And that’s how you configure a Sensitivity label the easy way!
Thanks for reading, and please reach out if you’d like to discuss the practical next steps you can take before you start creating Sensitivity labels in your production Microsoft 365 environment… or if you have a question and just want to chat more!